Winter 2023: Seven years later I’d discover Hurtta brand dog coats. This is quite a coat – photos at the bottom.
Original post:
A pug mom takes matters into her own hands when she discovers that it was impossible to buy off-the-rack for her barrel-chested baby.
My experience with dog apparel started years ago with a really cute cowl neck knit pullover coat purchased from a pet store. It would keep Peanut’s bare belly warm, and as a bonus, she’d look extra adorable! Tags removed, I tried to work the pug into the sock-like tube. It wasn’t great. Later on I’d discover another off-the-rack coat that was not only thicker but also fastened with Velcro. Even better! Tags removed, I lifted her up from the front, awkwardly threaded her legs through the leg holes (which could take a while if she kept pulling her legs back out) and tried to affix the Velcro under the belly. It was about one to two inches away from fastening. I would continue to find a variety of coats that seemed like winners but always missed the mark.
Determined that Peanut would have a coat she could actually wear, I decided to take a sewing class and make one myself. Since I hadn’t touched a sewing machine since Junior High school, I took a basic sewing class from the local Jo-Ann Fabrics store. Our instructor Teri was fabulous and helped me pick out a good, basic sewing machine.
Experimenting with different patterns using fleece bulk fabric, I finally found a pattern that worked well.
- It accommodates her barrel chest
- It’s easy to get on and off
- Peanut can be standing or sitting while I put on the coat
- No awkward wrestling with getting legs in and out
From my various attempts, this is one of the designs I like best.
Winter Coat How-To
Materials
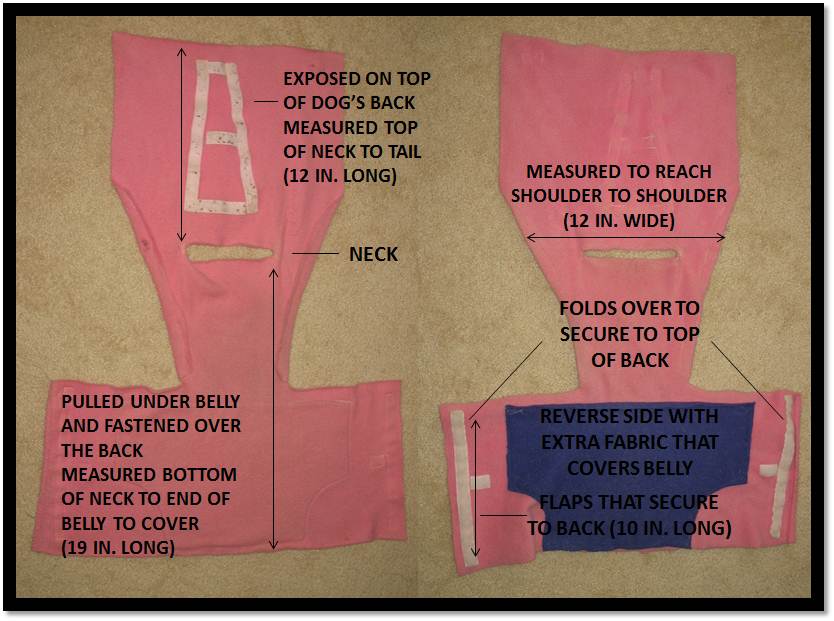
- Fleece fabric: Whole piece sized large enough to fold over and cover the dog’s entire body from neck to tail. In my opinion, an extra layer for the tummy is a nice touch.
- Velcro: Enough strips to be applied from neck to tail along the back side as well as at least two long strips on the underside that will fold over to meet the back. Having enough Velcro allows for easy application each time the coat is put on; nothing needs to line up exactly to get a snug fit.
- Fabric Shears: Any scissors will do but fabric-only shears seem to make extra-sharp cuts.
- Pins
- Sewing Machine: Primarily for the Velcro as I find that too difficult to stitch by hand.
I started out by ensuring I first had the proper length with the cut for the neck. Next, I played around with how much I would need to cut away around the shoulders so that it narrowed properly. The only hems here are around the shoulders so that it looks a bit neater. The fabric keeps its shape well enough around all the edges. It doesn’t stretch out or fray so adding any additional length to your measurements for hems is unnecessary.
Note that the Velcro strips sewn on the back narrow towards the tail to accommodate a snugger fit for Peanut. (Her sparsely-furred belly hangs a bit back there and I did not want her catching a draft.) I did not modify the cut of the cloth, only how I applied the Velcro.
Use caution and common sense if you do any measuring, cutting, and pinning while the coat is on the dog!

Coat-cum-Harness
Since the winter coats were originally created, Peanut has required some assistance with keeping her balance when we let her out to go potty. She has trouble at times keeping steady, especially on uneven ground. I assumed we’d need to purchase a separate harness, but when I considered factors such as the accuracy of fit, threading her into a harness four times a day, and possibly having to put the harness over the coat, I considered turning the existing coat into a harness. An internet search revealed a photo of a key chain ring that was sewn onto a fabric harness for just the upper body that would allow for attaching a leash. Bingo!
Materials
- Dog coat
- Key chain rings
- Ribbon
- Sewing machine
- Bungee cord or luggage strap with hooks

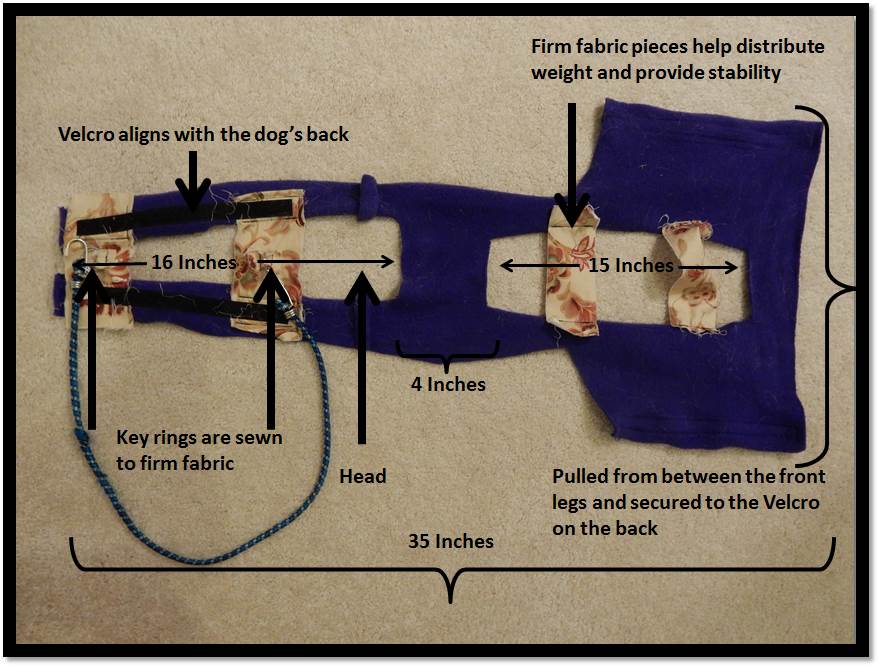
I conveniently had access to lots of unused key chains, so I sewed a ribbon over the back of the coat and threaded it through the key rings. It’s important to consider where the pressure will be applied when pulling up so it’s as comfortable as possible on your bestie. I focused the pressure around the upper chest, avoiding the neck, and just below the hip bones. Since the coat covers the entire upper and lower body, the pressure should be more distributed.

Yes, I have my dog attached to a bungee cord – but hear me out!
I could have used a strap with clips from a piece of luggage, for example, but I went with a bungee cord secured by twist ties. It’s a good length for me to hold (a bit short for my husband) and affords a little give when tugging upwards. The twist ties are a simple way to keep the cord hooks from unhooking.
Summer-Weight Harness
Using the same basic pattern of the winter coat, I created a summer-weight harness.

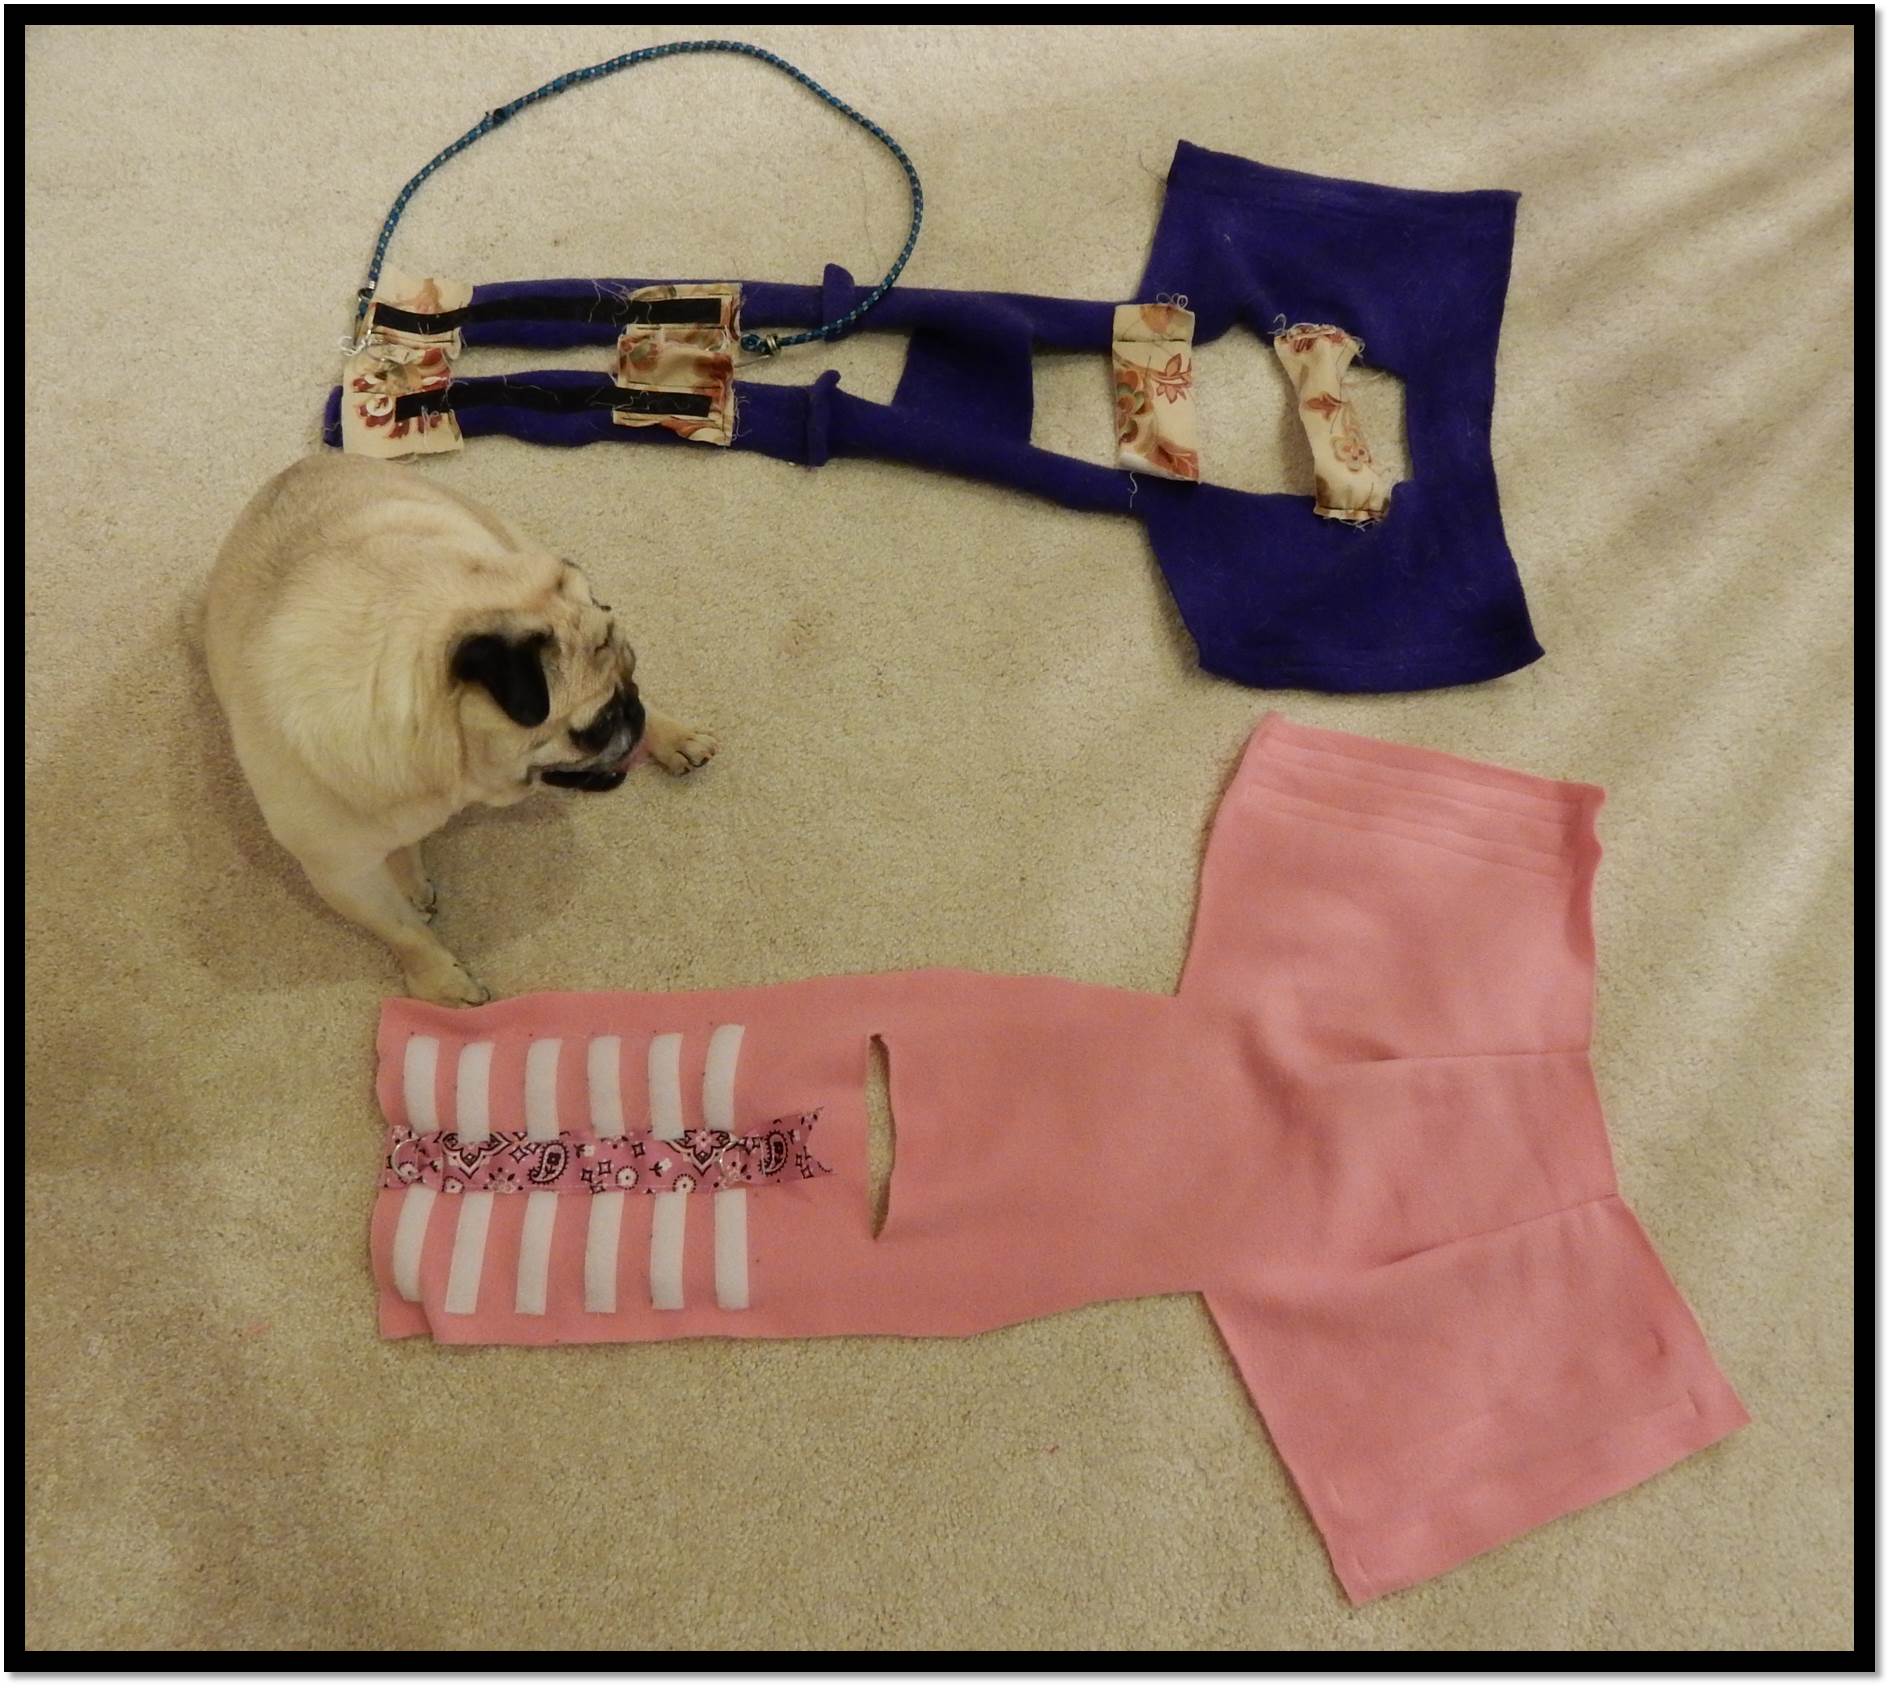
The pink coat in this photo has a variation in the Velcro pattern from the first coat shown. This pattern affords more wiggle room for where exactly the sides get attached. It’s a matter of preference.
The summer harness uses the same basic pattern of the winter coat which is cut from one large piece of cloth. Two pieces of cloth could be stitched together but the idea is that it folds over the dog so the dog is covered from the base of the underbelly to the base of the back. Most of the middle of the belly is cut away as well as the upper back. The straps along the back are about 2.5″ wide; leaving enough room for one to two strips of Velcro. To add back support for the key rings, two pieces of a stiffer fabric were sewn to both the front and back of the harness. Some additional editing for a snugger fit was required after the basic harness was created.

There are undoubtedly rugged, well-crafted harnesses available for purchase. Those options were explored, but since I wanted something right away and was concerned about sizing and the inability to return a custom order, I decided to try my hand at making one. For our purposes, these home made coat/harnesses work perfectly well.
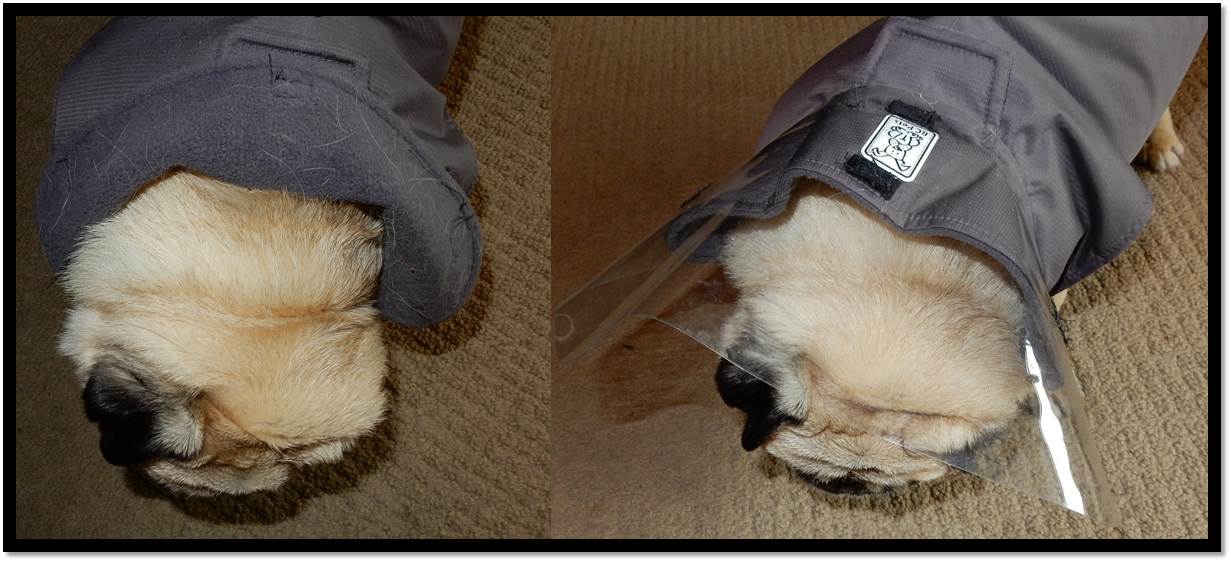
Rain Visor
A few years after I made my winter coat, I discovered this one by RC Pets purchased from Healthy Pet in Aurora, IL that is really close to what I had been originally searching for. Even though Peanut is petite for a pug, she is a size 14, so a bit larger than the total sizing and weight would suggest. It’s warm and attaches easily with velcro. As a bonus, it is also water resistant. In an “if-only-it-kept-the-rain-off-her-head-too” train of thought, I came up with a way to attach a rain visor to the collar.
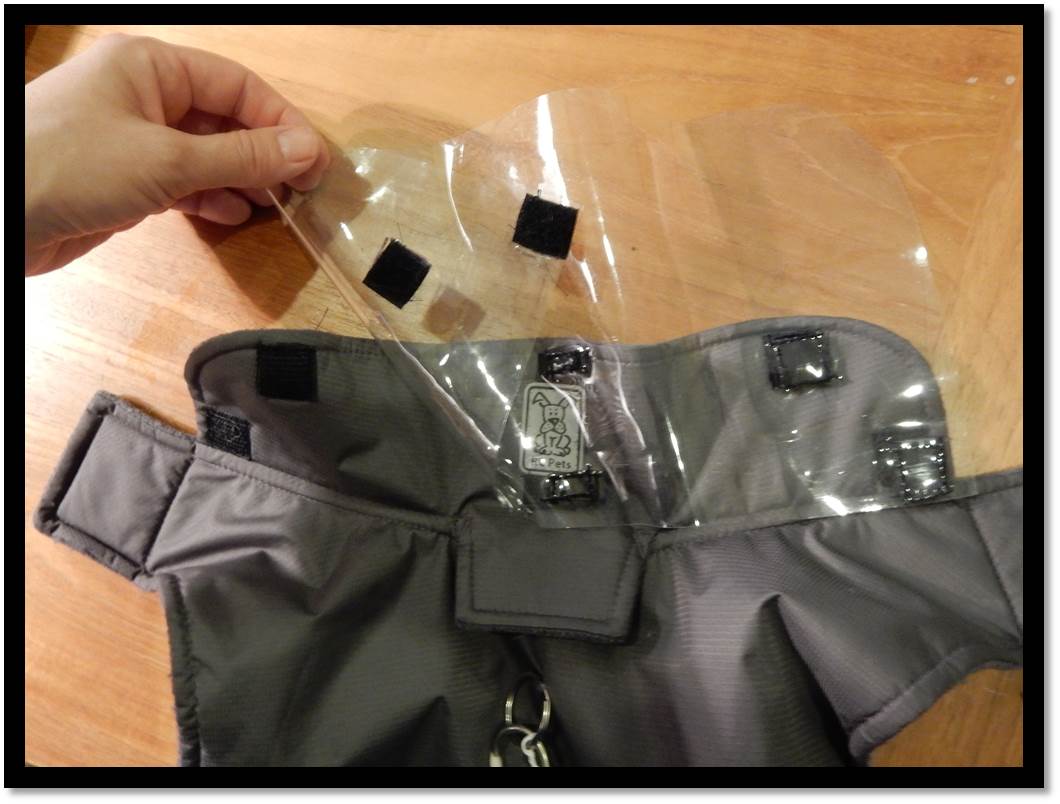
I purchased clear plastic fabric from the store and continually cut down the size in a visor shape until it appeared to hold up and not flop over from its own weight while pinned to either side. Using velcro, I cut little squares and stiched them to both the underside of the collar and the visor. If it’s not raining, I don’t use the visor.
I sewed key chain rings directly to the coat for harness support as well, so this is now our go-to coat for rainy days.
Want to see how I use mitten clips and suspenders to attach little doggie socks? Check out The Dogged Battle of Frosty Paws.
Dec. 2022 – I decided to purchase the Hurtta Extreme Warmer coat since it is easy-on and off with coverage of the belly, hips, thighs, and shoulders. This is a thick, very well-made coat. Must be like wearing a comforter around outside! I thought the one I purchased might be too big, but per the measurements, we’re solidly in this size recommendation. The only issue Pen has had with it is the bunchy fabric around the neck. She doesn’t like it over her ears or in her peripheral. I’ve rolled it up and pinned it back for now. Here’s the Extreme Warmer on the Hurtta US site and the one I purchased on Amazon. The cool video on their site shows a dog running right into the jacket neck. Yeah…not our experience. I still have to fuss a bit to get it over her head, but she eventually sits so I can buckle the straps over her back. 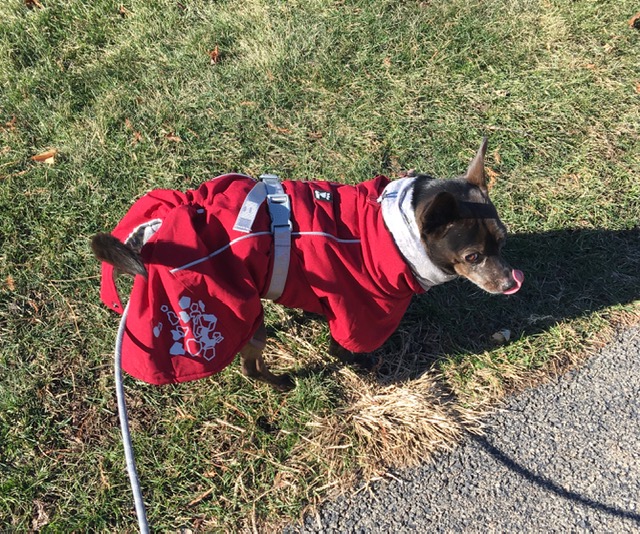


Pingback: The Dogged Battle of Frosty Paws | The Fickle Feather
Thanks for posting the summer one!
Thanks for posting the info on the summer one! Great ideas on all of them.
Thanks so much! I hope this post no only inspires creativity but also shows that anyone can learn simply but incredibly handy sewing basics for a variety of uses.